
No comments


As my family grows, the need for more home movies, photos and media storage grows too. After a few years of digital photography and video especially with the HD formats out there I accumulated quite a bit of data. There is some confusion with what the term “back up” really means. To some people, saving your data and media on to a single hard disk is considered back up. Let me assure you, it’s not! If (actually when) that drive fails everything on it is gone. Forever. Yes, you can try sending it to a data recovery shop but get ready to shell out big bucks and it probably won’t work. A true “back up” is having your data duplicated and then one set of that data is secure while you’re using the other. For most of us that’s not always practical. A step closer to back up is a multi-drive arrangement with some built-in security to enable you to replace and repair a bad or failing hard disk. This is where Drobo comes into play. Don’t get me wrong, it’s still not “back up” but its at least a fighting chance. You can achieve a multi-disk array with recovery several ways. There are Raid Arrays, Drobo (their own proprietary raid type thing) and other manufacturers like Sonology …a NAS server with their own recovery method. There are many to choose from. What I like about Drobo is the simplicity to their approach.
Drobo has been around a while. I didn’t want to commit fully with Drobo before trying it out. I purchased a Gen 2 Drobo 4 on eBay for $100. It’s a 4 disk configuration. Whats nice about the Drobo is you can put any speed, size, brand of disk in the unit and mix and match. So if you have a few drives lying around pop them in and your off. The other cool thing is it aggregates the storage space among the disks and reserves some space for recovery and expansion (more on that later). Once you put the disks in place the Drobo takes over and formats the set and all the lights turn green when its ready. One thing I love about the Drobo is its ability to expand simply by pulling out a smaller drive and replacing it with a larger one. It can even do this while its on and running and you can still access your data. Drobo connects to the computer via USB. The Gen 2 Drobo is usb 2.o but the current Gen 3 is usb 3.0. Once the drives are in and configured the Drobo more or less acts like any other hard disk drive you would connect to your computer. There is a software interface called “dashboard” that allows you to adjust settings and check information too.
On the Drobo website they have a calculator that will tell you what space you’ll end up with based on the size of drives you put into the unit. Below you see that I have 4 – two terabyte drives installed. The capacity meter shows that out of 4 drives a drives worth of space is reserved in case of a drive failure. So if all drives are the same size you get about 75% or your total capacity for storage.

Here is something to note. See the photo below…it has the same total TB for storage as the photo above but you end up with less storage. How is that? Well, the device has to protect all drives and allow for expansion but its largest drive in the mix is 3TB so it takes more to protect this drive. In this case you end up with 62% of your total capacity for storage.

Recently I had my first drive fail. Yes a blinking red light and a note that said replace this drive immediately. So I took the opportunity to pull it out and replace it with a new, larger drive. I had never been through this process and it made me a little nervous. After speaking with tech support I got the rundown on the lights and what they mean.
Green: All is good
Red: Replace this drive
Orange (not blinking): Replace this drive for more storage space
Blinking Green and Orange: Data protection in progress “DO NOT REMOVE THE DRIVES WHEN IN THIS MODE”
Blue Dot Lights: Indicates the amount of data storage you have used

After I swapped the drive all four lights started blinking green and orange so things were going as planned. What I didn’t expect was it took close to 40 hours to re-build the array back to safety. Wow! Started on a Sunday night and finished on a Wednesday morning. I guess it’s better than the alternative…lost data. Once the lights were all green it was business as usual. So far I have replaced a failed disk and expanded two others and have been through the data protection process 3 times and have not lost any data. Nice.
There is a new Gen 3 which has USB 3.0 interface and is rumored to have much faster build times when protecting data or setting up arrays. I was able to order one of those at a large discount at only $199. When the new unit arrives I can simply power down my Gen 2, remove the drives and place the drives (in the same order) in my Gen 3 and turn it on and it should be ready to go.

All is not perfect. A couple of drawbacks. It’s not a NAS, so no network storage. They do offer units with network options but there are better brands and devices for that in my opinion. If you’re looking for a device to access data across the network then don’t buy a Drobo. The units are fairly slow and Service at Drobo is OK at best. They get a little stubborn when they realize you’re out of warranty. My take is that if you’re a company that claims to keep data safe then when a customer is stressed and trying to implement the procedures your company sets up to do that then HELP THEM! I spent 10 minutes arguing with a rep once and then when his boss called me back it took her only 5 to help me with what I needed. I don’t seem to be alone with experiences like this either. That being said, the unit has performed well and I have not yet lost any data.
Don’t forget the upsides…any drives can be used. They can be hot swapped while the unit is running. Drobo will protect your data. Its simple, anyone can manage their data with a Drobo.
If you need to store some valuable data and want a tad more protection than just a single hard disk drive, Drobo could be a good option for you.
**November 8, 2015 UPDATE – I moved my drives from the Drobo 2nd Gen to the new Drobo 3rd Gen **
A quick note. I received my Gen 3 drobo a few days after writing this post. To re-cap the Gen 3 gives you USB 3.0 connection speeds and a faster processor that is supposed to cut down on data protection and recovery times. TRANSFER…Well all did not go as planned. It was supposed to be as simple as moving the drives over from the old machine to the new machine and all would be well. In my case the transfer did not work properly. The new machine did not recognize one of the drives upon transfer. After a restart and re-seating all of the drives it finally took. Then the machine went through data protection process which I can report happily that all the data is still there and the process took about 8-10 hours as compared to the previous machine taking around 30-40 hours. Huge improvement. I never did lose any data so I still have to give Drobo props on keeping their promise on data protection. As far as the USB 3.0 speeds…well after a speed test its not impressive but its better. The speed and general functionality of the Drobo dashboard are far improved too. Oh and one other nice thing…it allows me to allocate a section of storage to be used for time machine backups…nice.
A nice video I have recently come across that explains Drobo and how it works.

This is a nice program if for nothing else to use as a vehicle to upload your photos into Flicker. If you don’t already know about Flickr’s free 1TB of storage for your photos and videos then go read my previous blog HERE.
There are several ways to get your photos to flickr. You can sync from your iPhotos library but I don’t like that method. If you delete photos from your iPhoto library when it “synchs” with flickr it will also delete the photos from Flickr. (not good for me)
You can use the Flickr app in the iPhone or iPad and have the “auto upload setting” enabled but you need to make sure of two things… 1-You are in wifi so you don’t use up data (this is a setting you control) and 2-You have the app ON when you are in wifi…otherwise it won’t work. Ultimately this only backs up the photos on your phone or iPad.
When it comes to uploading and backing up photos I like to have my photos in two places. A hard disk or server (on site) and on Flickr. That way if there is a major catastrophe at my house there is an off site backup…Flickr.
F-Stop is a program or app for the Mac. What I like about it is the ability to mass upload photos even if they are in folders and it sets the set name to that folder name. So if your folder is named “2003 christmas” then it will create a set with all of that folder’s pictures named “2003 Christmas”. Nothing super special but saves you a step that you would normally have to do.
How it works. Download the app and upon set up it asks to link to Flicker. It will take you to the flickr page and you click on “yes” allow control and then Flickr gives you a 9 digit access code which you then paste into the f-stop app set up window. Hit enter and you will see your sets and Flickr info load. Mine looks like this…

Once on this page you can select the UPLOAD button on the left…

That will bring you to an upload page like this…

Now you will open the location of the pictures that you want to back up and drag them into the area that says “Drag Images or Directories here”. You can even drag in whole folders.

Pick the folder or pic you want and it will populate the “drag pictures here” area and then go to the right hand side of the pane and choose if you want it to be private, friends or family only etc and hit start batch

So yes you can keep adding as much as you want and the batch will run until complete. It is also a one way trip meaning that it won’t delete the originals so you will be duplicating your photos which in my case is the desired result.
Once your photos are on Flickr you can use an app on your iPad or your iPhone called FlickStackr which in my opinion is the best way to look at the photos on Flickr. Its fast and super intuitive. Take a look and good luck. Don’t hesitate to email with questions!
Tutorial
This is FlickStackr on my iPad Mini in Icon view. Very Cool!

Ever heard of IFTTT? Me either until I attended a network seminar at a local real estate office back in October. The presenter told us about IFTTT (if then then that) website that allows you to make an automated trigger with two programs or resources either on your computer or iPhone, iPad etc. At first I didn’t give it much thought thinking it was just a gadget or possibly a network privacy concern but after looking again I found something I really liked.
I often look for used products on craigslist. First off let me say…craigslist is not for everyone. It can be time consuming, fruitless and sometimes dangerous to use craigslist (creepy people) but those who do use it know it can be a great way to get used products for a killer price, sometimes even free.
The problem is having to constantly sift through the listings trying to find the perfect item before the next guy buys it before you. I just don’t have time. In comes IFTTT to the rescue. With IFTTT you can trigger a specific craigslist search to send you an email each time a new item is listed that fits that search. Let me break it down…example, lets say you are looking for a Mac Mini and specifically a 2012 model. You can go to IFTTT and say “if” a mac mini 2012 is listed on craigslist “then” email me (any email that you specify). That way you get an occasional “ding” throughout the day in your mail box, you take a look, if the ad looks good follow up, if not delete. No more craigslist searching day after day.
Let me show you how…Go to ifttt.com
On this page type in craigslist and search

Then Choose the recipe by mckenziec as shown below

Now set up your search criteria by clicking SEARCH URL

That will take you to the craigslist page. Make sure you are in your area or city and type in the search (for my example “mac mini 2012”) and hit search. Once the page loads you copy the page address at the top of your browser.

Now back on the recipe page enter that URL or paste it like this…

Then click USE RECIPE. That should be it. Now any time anyone adds a “mac mini 2012” listing you will be notified via email. Once the Recipe is created you can check it by clicking the “CHECK” button to make sure it works and all the components are “talking” to one another. You can go back and change, disable or delete this at anytime too.
This is just one way to use ifttt…enjoy.
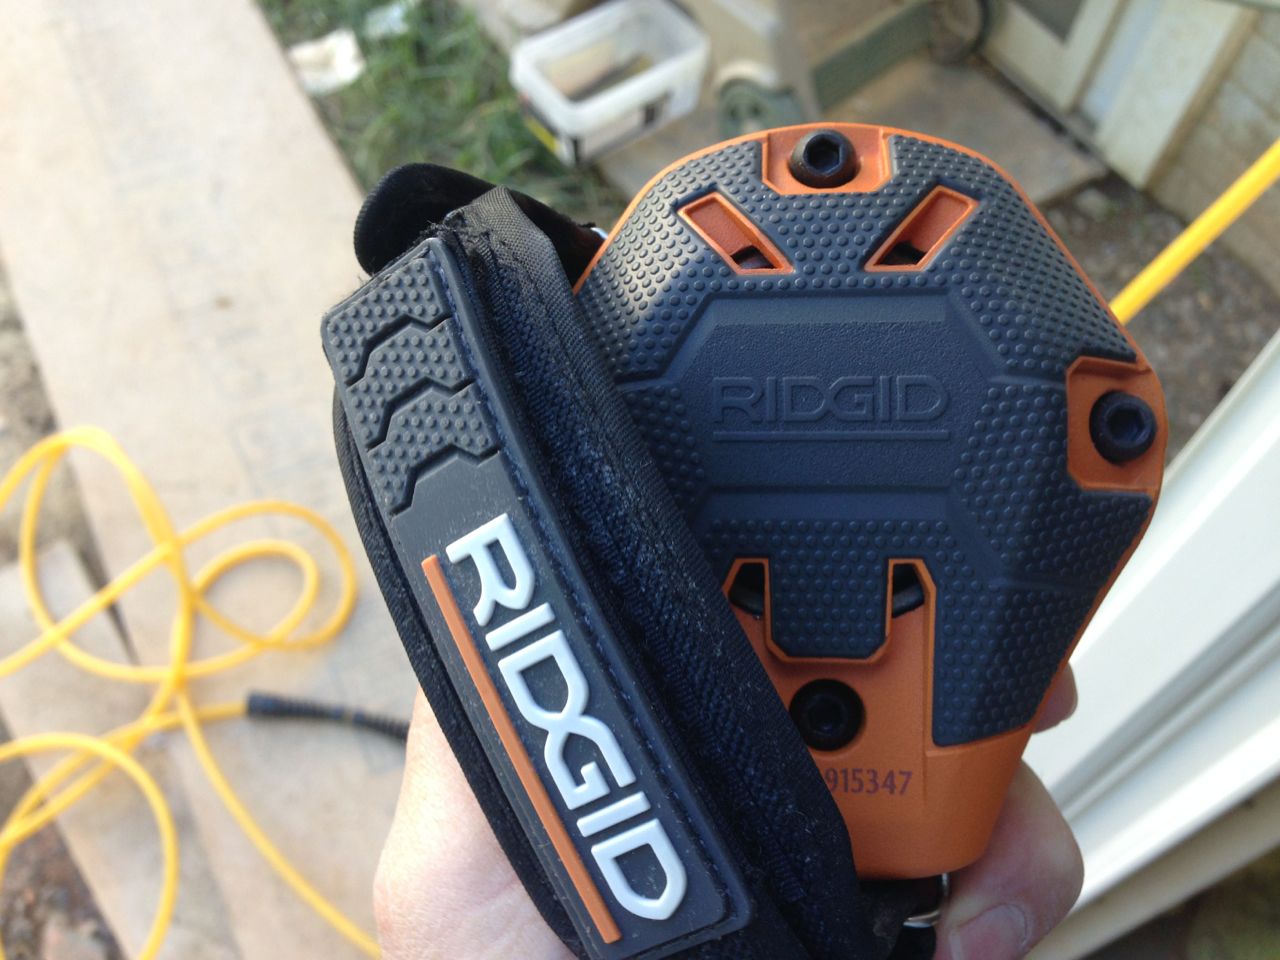
I am a contractor so its very hard to get me excited over tools. To me a saw is a saw and a drill is a drill. I am jaded I know but every now and then something cool comes along and the kid in me gets all giddy. One of my employees came to me the other day stressing that he had a next to impossible job of nailing a hanger (construction support device) in a tight location. I remembered seeing these once but had a hard time finding this until I hit the shelf at Home Depot. There is a gadget called a Palm Nailer sold next to the air compressors and nail guns in Home Depot. Its made by home depots own house brand RIGID and it is only $69.
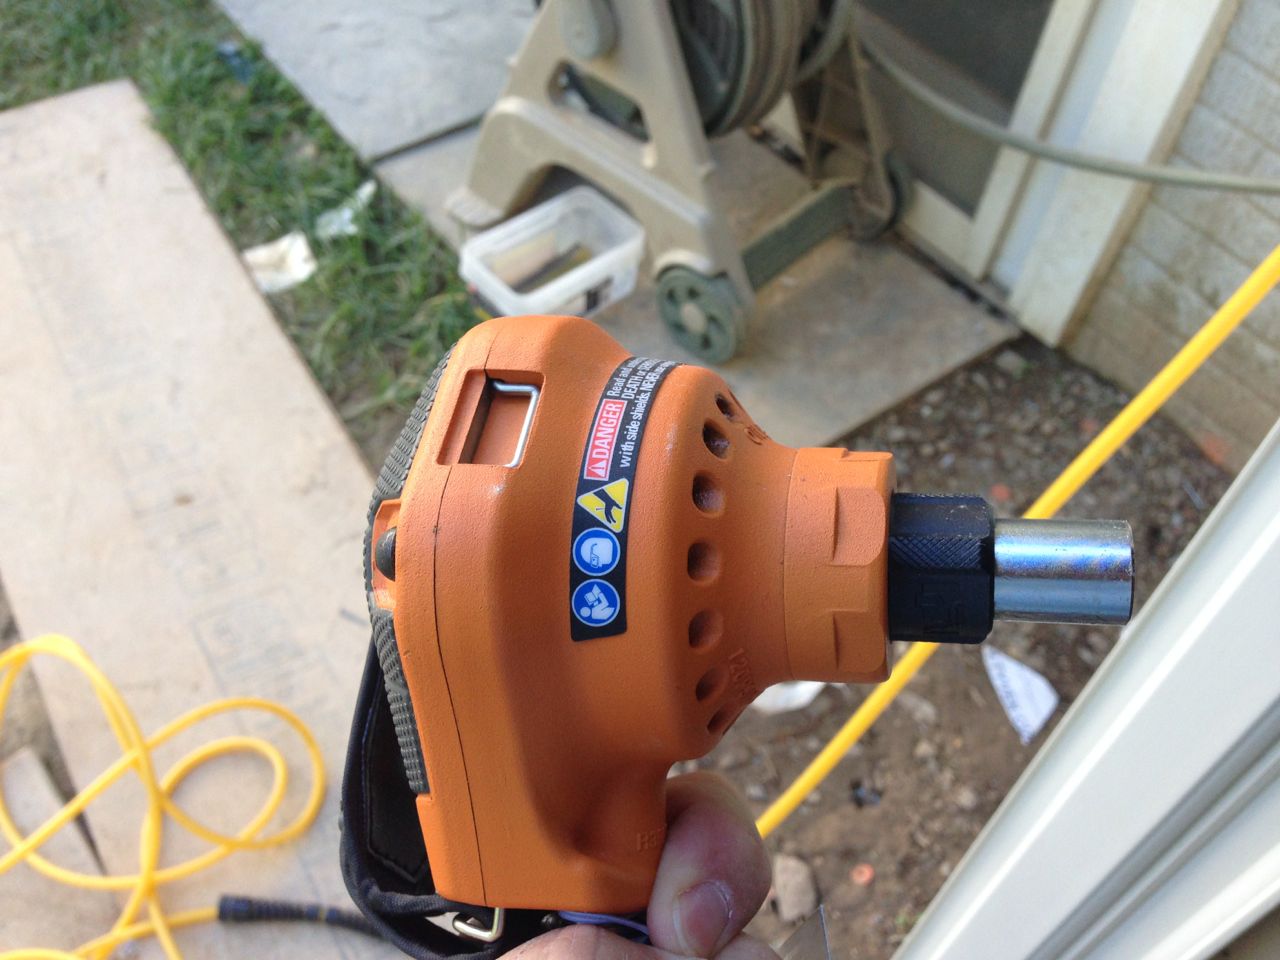
The nailer fits in the palm of your hand and drives the nail in place with repeated pulses of air with a “tapping” system similar to a jack hammer. Its only 5-1/2″ deep and seems to be built very well. The nose of the nailer has a magnetic charge so it holds the nail in place until you are ready to drive it in. Its very fast and the nails penetrate like butter. For that tough spot, nails large or small…this is your tool. You will need to own or purchase an air compressor and hose if you don’t already have one but if you are a contractor or fabricator that already has these you will only need to invest the $69.
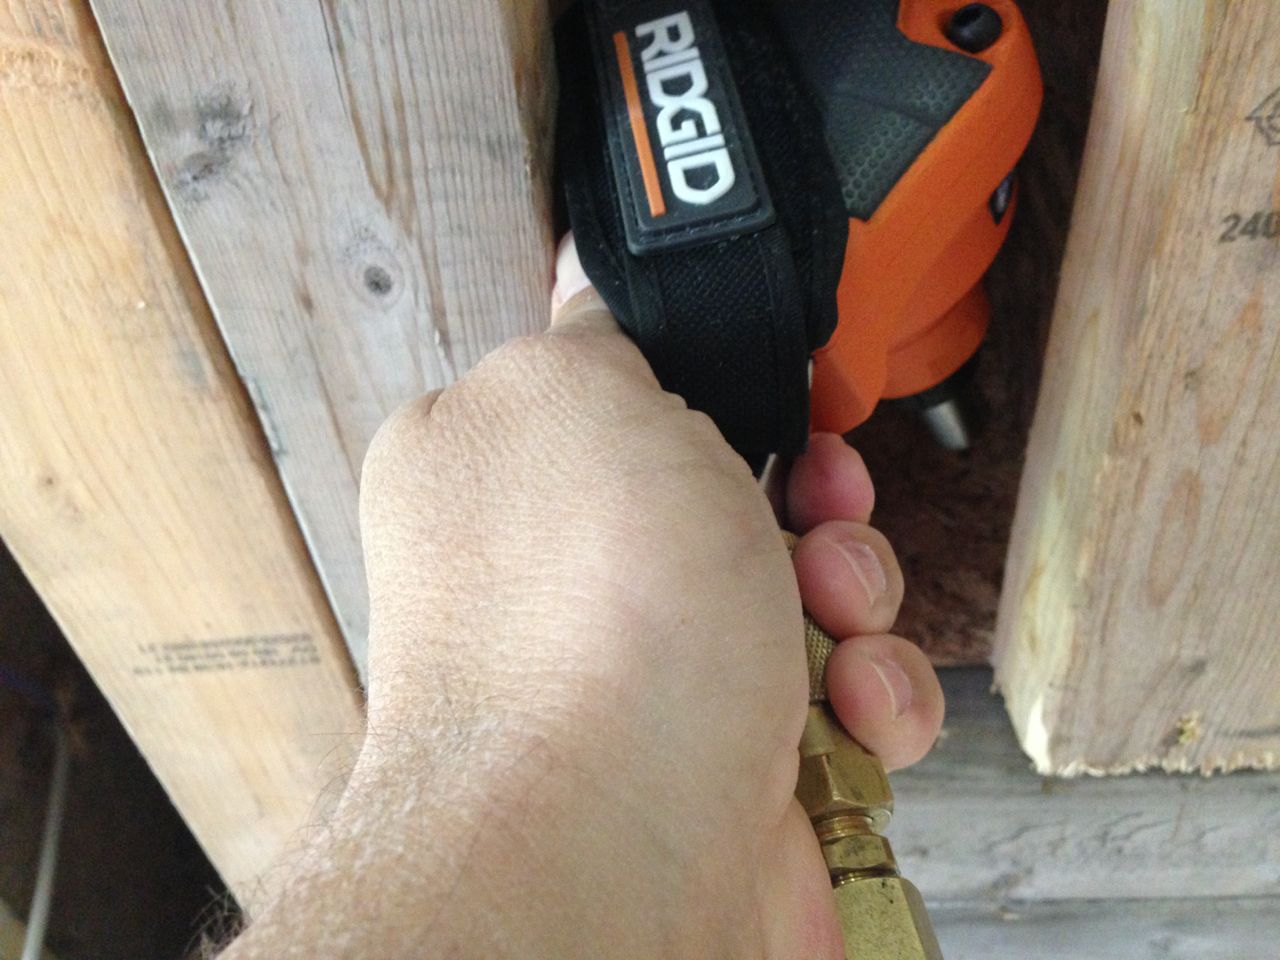
Check out the video to see it in action
The Bosch DLR130 is a unique measuring tool. It measures using a laser pointer and it is very accurate. For as long as I have been in the contracting business I have used a tape measure for my estimating and field work. Well, things have changed a bit and I must say for the better. The DLR130 enables me to effortlessly walk a room and obtain just about any dimension I need. It can measure a straight line, area of walls (length x width) and volume of rooms too (length x width x height). Just choose to the type of measurement, put the red laser on the target and push the button. Once the red laser dot shows up it gives you a dimension right away. I have tested this at close range and it is accurate to within about a 1/16 of an inch. I have also measured items as far as 150 feet away although I cannot vouch for absolute accuracy at that distance.
Walking around the room playing and measuring the distance from me to my children (cautious not to shine it in their eyes) a lightbulb went off. This is not only a good tool for construction and estimating but perfect for a video or movie set. You can shoot a distance for just about any object and determine focal lengths and subject distances in a flash. The possibilities are endless.
The DLR130 has several memory buttons enabling you to add up distances or keep critical measurements to use for other calculations. I have included the DLR130 user manual for more details and information.
The DLR130 is priced at $79 and for my line of work its an easy choice to buy one of these. It makes the estimating and overall sales process so much smoother without the noise and hassle of a steel tape. The next time I shoot a Wedding or a video event I will take the DLR130 with me so I can nail down those tricky distances and depth of field calculations I always struggle with. Once you have one of these you won’t regret it.
Your can buy one here. Bosch DLR130K Digital Distance Measurer Kit

Buy one at Amazon here


